Monday, 16 September 2013

Baby blocks

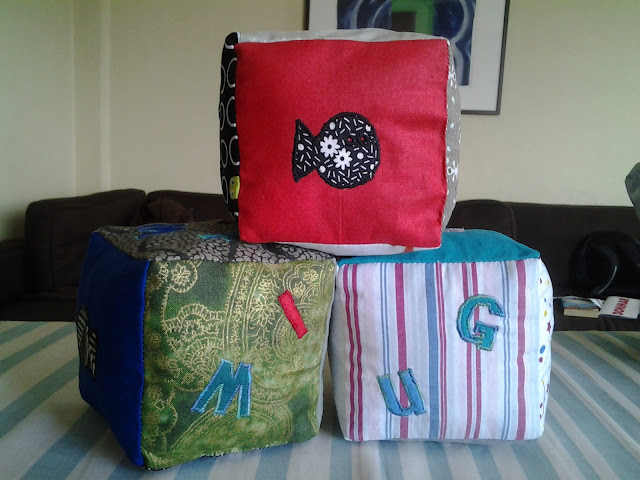
Cute alert! Got the idea from flicking through a magazine - can't remember which one - and essentially quite simple. Using my Sizzix machine I made standard squares. I bought some letter stamps on ebay but unfortunately they wern't as big as I'd hoped they would be - I wanted one lette on each block face but with the smaller shapes I went for 2-3 on each face, and the eet I bought came with a cute fish, so he's on there too!

So another gift set - this time for my PA who is on paternity leave.

Sunday, 1 September 2013

Waistcoat - complete

Well it's done. Overall I think it looks good  so am happy  ...

... But  ...

... It doesn't fit my niece. :-( She has very politely said she's not bothered about it doing up, and it will look fine worn open  ... But it  should have fitted. So I'm wondering if the pattern didn't have seam allowances. I'm sure I measured her right and she hasn't grown.

Anyway, construction was mixed. Some bits really simple but in othe places the instructions were completely confusing. In the end I gave up following the instructions and did final construction based on the Victoria Blazer pattern, which worked fine.

Tuesday, 13 August 2013

Victoria Blazer _ the final product

Sorry!! Finished a few weeks ago and have only just got around to taking any photographs. So here it is, the final blazer, with arms and lining and everything!

Love it!!!!!  Want to make 3 more!!

So adjustments.  I'm glad I gave it an extra inch, but would probably give it a bit more length again.  With the fuller figure a too cropped blazer just highlights the bulge! The width across the back is great - so often with jackets i feel my broad back is tied up in cement vlocks, but this is fab.  I do feel there's a little much fabric in the front though so a slight reduction so that the front dart comes more towards the centre of the boob than towards the inside.

So defo another cropped in a lighter fabric and probably a long one, maybe in a grey  ...

Saturday, 10 August 2013

Waistcost 2

Having realised that when I went to buy more black thread the other day that I actually bought white (why?!?) I couldn't crack straight into the waistcoat. But  ... Neice being a little on quirky side she requested a duck on the inside.

...

Ok  ...

So applique duck time. After much crappy drawing of a 2D duck, hubby shoved me out the way and took on the drawing task. I used interfacing on each piece to stabilise the fabric and the sewed the pieces together leaving the raw edges a la Poppy Treffy (although obvs not anywhere near her standard!) giving it a wing, beak and eye. And then of course sewing it into the centre of the back lining. Think it looks pretty cool  ... if you like secret ducks in your clothing!

Waistcoat 1

My niece turns 18 at the end of this month. Having asked her what she might want she said 'a waistcoat'.  Simple enough I guess. Starting point was to find a pattern. Being female she needs something with a bit of shape but so many waistcoats for women are incredibly girly (see New Look for my particular favourite in pink!) and she has a far more relaxed look - she's a jeans and trainers kind of gal.

And then I found this one in Burda Style magazine  ... Well found it online and as it's a back issue a quick trip to ebay got me the magazine! It does 'waistcoat' well, have a female shape to it without screaming 'I'm a girl!'

Onto the fabric shopping. It says to use an ottoman fabric. Well I'll be damed if I can find one. I did find an amzing knitted fabric that I thought might work but as it was £65 per metre  ... Yes, per metre  ... I felt that whilst I love my niece I don't love her that much. So have gone off-piste and am trying it with a cotton twill. We'll see if this agfects the drape I guess.

Anyway, first time making anything from one of these multi-pattern magazines. Having pulled out the pattern pages it looks like somone has gone crazy with some coloured pens. How the hell am I supposed to work with this? But thanks to the Male Pattern Boldness blog I tried highlight the pattern I want in the size I want with a felt pen, making it easier to trace. Et voila! Job done.

Phew!! Now onto the sewing.
Sunday, 28 July 2013

Victoria Blazer 5.2

Well the sleeves are in! A few minor hiccips with easing them in  ... as easing isn't easy! Very pleased I've done the contrasting cuff - think it looks fab.

The grand unveiling of the final product will be with you shortly.

Wednesday, 24 July 2013

Victoria Blazer sewalong 5.1

So the next episode is sleeves, but tonight I've only managed cuffs. they are very exciting though. I'm pleased I went for the contrasting cuff - I think it looks super spesh. What I do wish I had done is got some white bias binding to finish off the inside sleeve. I've used pinking shears to finish the seam, which is fine, but I just think it would look nicer with the seams bound.

Onwards and upwards - probably the weekend before I can finish the sleeves now though.

Sunday, 21 July 2013

Victoria sewalong 4 - prepping the collars and cuffs

Where's post 3 I hear you cry? Well, post #3 on the sew along is for versions 1 & 3 only, and as I'm doing v2 I got a break. So straight to step 4 - prepping collar, cuffs and lapels. I've decided to go for a contrast cuff using the lining fabric - that zebra is too fab to stay on the inside. But this does mean the collar and cuffs don't match  ...

There's not a lot to say about this step - very simple. So I would like to share my favourite turning implement. For the collar, cuffs and lapels you want sharp corners. My new item of preference for this is the propelling pencil (no lead!). It's got a small point which helps for sharpness but isn't sharp itself, meaning I don't go through the fabric - bonza. It's the small things  ...

House coasters

Well here they are - cute huh? Really simple and quite effective set of coasters; perfect as a house warming present. The design is from an old Sew Hip magazine by Jo Ebisujima who designed the Travel Tray I made for hubby. The only deviation from the design was to leave out the spoon hoop - didn't quite see the point of those  ...

Anyway, the very exciting aspect of these are that hubby got involved in making them - they are for his brother after all. He did the (sewing machine) applique stitch around quite a few doors and windows as well as sewing the layes together and turning through a couple. Have I converted him to sewing? We'll see.

Hopefully the B-I-L will like the gift!

Monday, 15 July 2013

On a roll


Well, whilst I'm waiting for the next sew along post I'm desperate to get sewing something else. I've put an orde in for some fabric for another project  ... more on that when it comes through. But wait, what's that? Brother-in-law moving house in less than a week? Well I must make a house warming gift! So I had a rummage in some old Sew Hip magazines and found a cute pattern for house shaped coasters  that will be a great stash buster too.

Victoria Blazer SewAlong - 2

Well  ... Already it's got some shape and it looks like a jacket. I was quite anxious about creating the front dart but it was actually quite easy, especially with the pictures and extra instruction from the sewalong.

I'm a little anxious about the length. It's a cropped jacket; my original intention was to make the full length but there was only enough zebra fabric for the cropped so that was decision made. I did add an extra inch to the length when cutting out but I'm wondring if I should have gone for another one as well. We shall wait and see.

Monday, 8 July 2013

Victoria Blazer Sewalong - 1

Exciting times. A new project and I'm not doing it alone! I'm joining in with a sewalong so hopefully I'll get a bit of guidance as we go. I was put onto By Hand London by an old friend via Facebook. The Victoria who designed this blazer is her niece. I'm not really a suit kinda gal but sometimes you want something to throw over an outfit to go to an event and I thought this might do the job.

I was very excited to get the patten through - it is beautifully presented in a little cardboard wallet and you even get a label to sew into the item once finished. I got my fabric from Pumpkin Patch in Hailsham. I saw the zebra print and knew straight awy I wanted it. i'm not quite bold enough to have that as the main fabric (maybe one day  ...) and they only had a limited amount of it so with that as my lining I went for a plain black outer. I had intended to make vesion 1 - full length - but my limited fabric means I'm going for cropped.

So sewalong episode 1 is tracing and cutting - all good so far. Looking forward to getting stuck into this.

Monday, 1 July 2013

Wrap dress - completed!

All done! Relatively easy sew, although preventing the fabric stretching was a challenge. I like it  ... I think it's a bit big but hubby thinks it's the right size. I guess I just like to show a bit more cleavage  ... And I think the sleeves feel a bit big.

Anyway, I do like it. The fabric works nicely - i think it will work well as a work dress, althpugh I may attack the neckline at some point.

It was a test for me though - do it the quick way and maybe get ot wrong or do it the long, slow way and get it right first time. I'm not a fan of basting but when it came to the neckline I felt I had to hand-baste as I think I used too much seam allowabce meaning I didn't have much to play with and just pinning made it look like it would end up significantly wonky.

Trousers - the epilogue!

Well, here you go. They've survived a trip thrpugh the washing machine and an ironing by hubby. Not bad eh?

Sunday, 23 June 2013

Wrap dress

And so as one quest ends another begins.  I got this patten a long time ago with Sew magazine, bougt the fabric then wussed out of making it.  But with the confidence of the trousers behind me I feel ready to make myself something  .... And in theory  this should be easier than trousers!

It's a Simplicity pattern, 2369. I'm going for version B - short sleeves, just above the knee. So I pulled out the patten to look in detail and realised that the version I had didn't go up to my size. So I've had to buy the bigger version - anyone want the smaller one for P&P?

So I've traced and cut my pattern, and laid it out on the fabric. This is the nerve-wracking bit - cutting the cloth. What if I mess it up? What if I've got the wrong size? What if it's wonky?  ... Oh well, *snip*

Saturday, 22 June 2013

Bunting

More bunting made for a friend's nursery - simple. Cath Kidson fabric as requested.

Trousers - the finale!

And they're all done! Woo hoo!  I think the button holes in the rear pockets are a little low and it took me ages to get round to hand hemming (tried machime hemming and looked awful!) but they are finished  ...

... And they look like real trousers. Hubby has worn them to work and everything! Whoop whoop.

And he's already said he wants a brown pair and a linen pair

Sunday, 2 June 2013

Trousers 5

Almost finished  ...

Belt loops were traumatic! Had to cut them out and start again as I simply couldn't turn them through. Took me 1 1/2hrs just to make 6 belt loops - not even attach them  .... Just make them!

But rear seam now sewn, waistband on  ... They fit - hoorah! So, finishing touches to go:
* sew the belt loops up
* put in the fly button holes
* sew on all buttons
* hems

Getting there  ...

Monday, 27 May 2013

Trousers 4

Heading into the end game now. So both legs sewn together and now attached at the front. My first fly opening and I'm pretty chuffed that today the seam ripper hasn't been out and the fly is in the rigt place  ... so doing better (other than within the time challenge) than some of the Great British Sewing Bee contestants! It wasn't too tricky once I'd worked out what the instructions were saying but can definitely see how it could all go wrong in a rush.

Just the waist band, back seam and bottom hems to go now  ....

Sunday, 26 May 2013

Trousers 3

Man, pockets take a long time. 2hrs this evening just working on these back pockets. Ok, the seam ripper had to come out a few times which didn't help. And I think the button holes are a bit too low but not the most importsnt point in the world. it's quite exciting to see a fully formed pocket.

But I'm definitely not good enough for Great British Sewing Bee - they had to make a pair of men's trousers in just a few hours. If that were me then they'd be presented with pieces of trouser!

Saturday, 25 May 2013

Trousers 2

Well I got down to it this evening and started the trousers. That first cut into the fabric was very nerve wracking but then there was something quite satisfying about slicing into the fresh fabric.

So far I've put in the front pockets on both sides and created the opening for one of the rear pockets. I don't think the picture's that good but it shows the piping around the opening. Did it wrong the first time - first outing for the seam ripper, I'm sure there'll be many more! I'm almost happy with this but the hubby was delighted  ...

We'll see how it goes tomorrow  ...

Monday, 20 May 2013

Strapping bag

Another one from Small Stash Sewing - I was having a quick flick through it the other night when I spotted this. The design says to use courdroy but I thought some of my left-over jeans from my upcycled skirt might do the trick, along with some fat quarters I had cheekily purchased online a while back with no project in mind.

Quite an easy make, bag lining, then bag outside, and sew them together. I added a clasp and it's got a pocket inside. Prett neat huh?

Scrap quilt

I have been working on this one for months! Another design from the magazine Scrap Quilts. I love this magazine, too many ideas for using up all the bits of fabric I've been hoarding. Making all the panels took a long time. I've focused on using the greeny-blue fabrics I have and managed to have enough fabric for 40 7 1/4" blocks!!

It's a massive quilt and I have foolishly decided to do quite a clise quilting pattern. It's already taken me ages and it's going to take a lot longer, hence the need for other projects. there'll be more of an update when I actually finish this one.

Denim skirt

Ok, bit of a catch up time again  ... although I did literally just finish this one. Ages ago I ripped the seams of this old pair of jeans. I loved these jeans, they were so comfy. Unfortunately they wore through and split in the thigh area. So when I got this patterned fabric through a year or two back by mistake when I'd ordered sonething else I thought it might work nicely as a panel. I spent quite a while fannying around trying to get the fullness of the skirt right, just from trying it on and asking the hubby if it looked right  ... I need a dress form!

So overall I'm quite happy with it - a good, first upcycle item.

Trousers 1

My husband and I have a tradition of Christmas cracker presents.  we make our crackers and rather than a mood fish or mini plqstic hoop-la we put in our own gifts  ... Or a representation of a gift. Last Christmas I decided it was about time I made good on my promise of making him trousers. He's 6'6" and that height is all in his legs, so ready to wear trousers rarely fit him or he has to spend almost £100 in a specialist shop.

So for the cracker I knocked up a quick pair of mini-trousers from Batman fabric and then gave him tha pattern. I chose Burda 7841 - It looked smart enough for a work trouser but also could work as a more casual pant. This is the firts time I've worked with a proper pattern for about 22 years  ... since school! So it's a bit of a test for me. It's also my first proper foray in clothes making so I know the sewing has to be good, no more 'rustic'!

Step 1 - shopping! Took the husband to John Lewis so he could pick the fabric. He went for a dark grey gabardine. Couldn't find a zip that was the right length so I thought longer was better than shorter. It was a little bit crazy in the shop - we almost had a fight over a tube of buttons!

Step 2 - pattern cutting. Having measured hubby I identified which size to go for, but obviously the legs need adjusting.  I've added in 3/4" into both the lower and upper leg on each pattern piece. I want to crack on but know I need to wash my fabrics before starting  ...

Saturday, 12 January 2013

Xmas decorations 3

With a copy of Sew magazine I got a free xmas garland to make. I left it a bit late but did make a bit of it - thought it was better to do a little rather than leave it a whole year to forget again!